This is the first out of the many tutorials planned in which we will be showing you how to set up your frame looms and weave these pretty patterns. Would you believe us if we told you you could come up with thousands of compositions using only these 3 patterns?
Interesting right? Let’s jump right into it !!
If you look at it in a general way, weaving has only 3 steps in it. The first is to set up the loom, the 2nd is weaving and lastly it is trimming and taking your sample off the loom.
It’s always important to learn a few words of the Weaving vocabulary when you start off your learning journey.
WARP- the yarns bound to the loom is called warp.
WEFT- the yarns we introduce into the warp is called weft.
PICK- a single row of weft yarn is called a pick.
Warping the frame loom
Frame looms are by far the easiest looms to use as a beginner,
They take less time and are effortless.
Count the number of holes on one side of your loom wind the
Warp thread around the loom that many times to calculate
the amount of warp yarn you will need. We have 21 holes in
Our rectangle loom so we will wind it 21 times around the frame as shown on the right.
Now that you are done calculating the amount of warp you need insert one end of the warp yarn into the 1st hole and glue it at the back. Coming to the front, insert the yarn through the hole directly opposite to the current one (refer picture 1).
Turn to the back and insert the yarn into the adjacent hole (refer picture 2). Continue the same way till you reach the last hole and glue it at the back to seal it.
If you are having doubts on warping click on the link below
NOTE- The way you warp the mini loom remains the same for both rectangular and square looms.
Weaving
The most basic weave is called tabby weave or plain weave. In this weave the needle travels through the warp in a one thread up and one thread down motion.
Starting the weave and changing colours
To start weaving , thread the needle and knot the end of the weft yarn around the 1st warp thread. Weave the 1st row from right to left, this is called a pick.
To weave the 2nd pick you will need to take a u turn and weave from left to right, but before that observe how the 1st pick ends, if it ends by going over the last warp thread then you need to start the 2nd pick by going under it. If it ends by going below the last warp thread then you need to start the 2nd pick by going above.
Do not pull the weft too much while weaving, this will cause your sides to shrink drastically. As you weave the layers keep pushing them together using your fingers to make an even surfaced weave.
When you are done weaving a colour and want to change it, end the 1st colour by knotting it around the last warp thread and start the next colour again by knotting it at the same end.
We will show you 3 patterns that can be used to create your own composition.
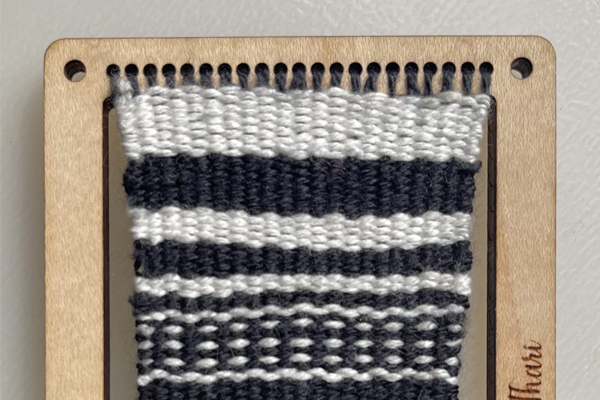
Solid horizontal stripes
Horizontal stripes are created by alternatively tabby weaving a few picks of the 1st colour (white) and a few picks of the 2nd colour (black). In our sample we have woven 10 picks of white and 10 picks of black at the first, as we wove we reduced the number of picks to reduce the thickness of the stripe
Dotted lines
Dotted lines are created by using 1 pick of the 1st colour(white) and 3 picks of the 2nd colour(black). If you need to space out the dots then you need to increase the number of picks for the 2nd colour (black).
Vertical lines
To create the vertical lines you will need 2 needles at the same time. You will have to weave one pick of the 1st colour (white) and one pick of the 2nd colour(black) alternatively.You can play around with these 3 techniques to create your own compositions, below is the pick order of ours.
You can play around with these 3 techniques to create your own compositions, below is the pick order of ours.
We have now reached the final step of the weaving process that is to trim off the extra yarns at the back and attach the jute thread to the loom.
There you go! a rectangular piece of art created by you and for you.